Thursday, March 31, 2016

Confessional Thursday | 3.31.16

Linking up with Jess of The Newly again for another Confessional Thursday!


I confess...

+  I bought into the whole "Turn on post notifications" for Instagram earlier this week when they supposedly rolled out their new algorithm. And then I immediately regretted it when I was getting noisy, annoying alerts every time someone posted something. I have since turned OFF post notifications for as many people as I could (there's no easy way to remember/keep track of who you turned post notifications on for), but I still get the occasional alert from people I forgot about. So far, I haven't noticed a difference in my Insta feed. Has anyone else??? Also, I've found myself reconsidering who I'm following on Insta.  Do I really need to keep up with the Kardashians? I might be unfollowing some people soon.

+  I can't bring myself to make Max's bed every day. It's so much effort (lower the side rails, pull up sheets and quilt, arrange stuffed animals and pillows) just to undo it all again at naptime and then again at bedtime. So, his bed is never made unless I've just changed the sheets. #sorrynotsorry #priorities

+  I cleaned my bathroom today and was shocked/disgusted at the dark brown film that covered our vanity top. It's from my dry shampoo (which I love); it's tinted so it doesn't leave white spots in your dark hair. Unfortunately, it leaves brown film everywhere else, and since I use it every other day, it piles up quickly. I couldn't see the film day-to-day, but when I wiped down the countertops, the rag was covered in the stuff. Ick. I'm still going to use the dry shampoo, though...

+  I'm considering keeping one of our snow shovels in the house to help clean up toys (both toddler and dog) at the end of each day. It's getting quite difficult/uncomfortable to bend over to pick things up at 32 weeks pregnant! Victor has asked me several times this week if I want him to get me one of these to help me reach things. I've politely declined, but it might be handy even when I'm not pregnant. Victor and I aren't the tallest people...

+  I always over-buy fruit at the grocery store. I love it so much! But then I forget about it and we end up having to toss rotten fruit after a while. Just this week, I bought strawberries, blueberries, mango, and bananas. We also have about 3 apples in our fruit basket, several clementines, and grapes in the fridge.

+  I love my new haircut. So much. There's nothing I don't like about it. Actually, that's a lie. I wore it curly one day shortly after I got it cut, and unfortunately, there aren't enough layers in the style, which causes me to have "triangle head" with my curls. However, I like how it looks straight and don't want to change that by getting more layers, so I'm dealing with it for now. It doesn't take too long to style now that it's short--which was the entire reason for cutting it in the first place--so that's enough to have me singing my hairdresser's praises for the foreseeable future. I think I'll need to bite the bullet and get some layers for the summer, though, since I almost exclusively go curly in the hot/humid months.


+  About every other day, Max wears one of his 18-month shirts for the last time (they're getting too short/tight for him), and I'm reluctantly coming to terms with the fact that he's almost 2 (HOW??? I feel like we just threw his first birthday party!!!) and is ready for 24 month/2T clothing. I'm just not ready!!!

+  Speaking of Max turning 2, I'm at a loss for how to celebrate his 2nd birthday in May. I'm nervous to plan anything because it'll be so close to baby's due date (just a little over a week prior). Any suggestions? I want to do something small with minimal effort, but I still want it to be special.

+  I was really getting discouraged about this pregnancy and all the "complications" I've been having (mainly occasional high blood pressure at the doctor's office), but we got some great news on Monday at our 31-week check-up and ultrasound: my 24-hour urine collection and bloodwork tests show completely normal creatinine and protein levels (yay!) and baby girl is growing right on track! The maternal-fetal doctor said that with the marginal cord insertion (the umbilical cord is inserted on the very edge of my placenta instead of in the middle), you have a 50/50 chance of having a small baby, but "obviously your baby isn't reading the textbooks!" So reassuring! Also, I find myself preferring male doctors over female doctors. I've seen 3 male doctors over the course of my two pregnancies and about 5 female doctors, and the male doctors, in my opinion, are more straightforward and no-nonsense. They actually put me more at ease.

+  Speaking of baby girl, I have yet to do any more work in her room. I painted a mirror frame for her last week, but that's it. I need to get on it!

I bought this mirror at Target years ago. The frame was off-white, but 3 coats of a coral acrylic paint from Michaels gave it new life!

That's all I have to spill! Until next time!

Wednesday, March 30, 2016

DIY Wooden Photo


I came across a tutorial for DIY wooden photos on Pinterest years ago, and I was immediately excited to create my own; I love wooden decorative objects, and I think it's so cool to see the woodgrain come through the photos when you transfer them. The first wooden photo I made was a photo of my mom, sister, and me in Central Park back in 2012 (I learned the hard way that I needed to flip the photo before printing it that time). Then I made some wedding gifts for darling Nelle at simply love. I also put a couple of our engagement photos on wood for my in-laws. I think I had planned to make some wooden wedding photos for our house, but I must've forgotten over the past 2.5 years. #oops

I used a wooden plaque from Michaels for this first attempt a few years ago.


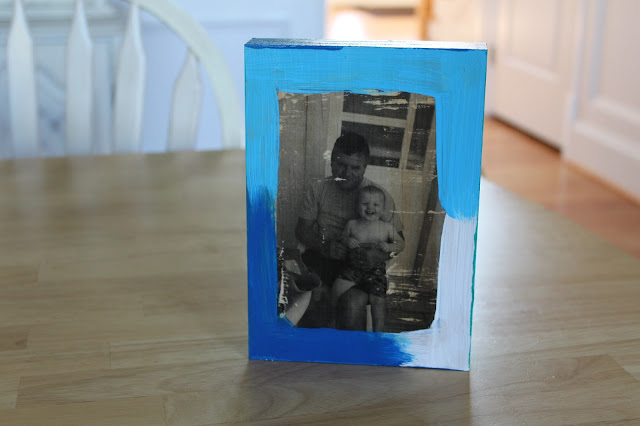
After racking my brain trying to think of a good gift-from-Max idea for my father-in-law's birthday, I decided to make a wooden photo for him! I documented the process of making this gift so I could share it with you in case you wanted to try your hand at this, as well!

A few warnings before you decide to take this on yourself:
  • The gel medium is a little pricey (an 8 oz. jar costs $15.99, but you can find cheaper ones online), so make sure you want to do this a couple of times to get your money's worth. The good news is, I bought my jar of gel medium in late 2012/early 2013 and it's still good today.
  • The best way to get more bang for your buck is to get raw wood from your local hardware store (you can have them cut it for you, too!). I bought a 2in. by 6in. by 8ft. piece of pine a couple of years ago and had it cut into 8-inch lengths, giving me a stack of wooden blocks to have on hand any time the mood would strike to make a wooden photo. This is much cheaper than purchasing wooden plaques from your local craft store.
If you're still not scared away, here we go!

What you'll need:
  • An untreated wooden surface (either a wooden plaque or a piece of lumber)
  • A photo printed on regular paper (I've only done this in black and white) **be sure to "flip horizontally" on your computer before printing
  • Gel medium
  • Paint brush or foam brush
  • business card or gift card
  • Water and sponge/cloth
  • Mod Podge
  • Optional: acrylic paint

What you'll do:
  1. Print your photo's mirror image on regular printer paper in the size you prefer. You could have your photo take up the entire surface of your wooden piece, or make it smaller. (My wooden piece was 6.5 inches by 8 inches, and my photo was 4 inches by 6 inches.) Trim off the excess paper.
  2. Using your foam brush or paint brush, apply a thick layer of gel medium to your wooden surface. Be sure the entire surface has a good amount of the gel on it, otherwise your photo won't transfer well (I've seen other tutorials which brush the gel medium directly onto the photo). Immediately place your printed photo face down onto the gel. 
    You want much more than this on your surface.


  3. Using a business card or gift card, smooth out any bumps or bubbles. Allow to sit overnight to dry.
  4. The next day, use a sponge or cloth and some warm water to saturate the paper, then use your hands to gently rub away the paper. The color from your photo will be "stuck" to the wood underneath. You may need to re-wet the surface and repeatedly rub to get all of the paper off. My advice is to work in small quadrants, wetting only a small area at a time to rub. 

  5. Once you have removed all of the paper, wipe the surface with a dry cloth and allow wood to dry. 

    This is the photo I added to the back.
  6. If preferred, you can use acrylic paint to paint around the edges of your photo. Since this was a gift from Max, I wanted him to have a hand in its creation, so we painted. If you do not wish to paint, skip to step 7. 
  7. After your surface is dry, brush on one or two coats of your preferred finish of Mod Podge (I used "Satin") to seal the photo. Allow to dry completely before handling.


This is a cool twist on a photo gift or keepsake for your home. The end product has a lot of character and looks so unique!


Max was so excited to give this project to his Vovo for his birthday last weekend. He couldn't wait to help him open it and show him what he made!


Monday, March 28, 2016

Easter Weekend 2016


I hope you had a lovely Easter weekend with your loved ones! We did some Costco shopping on Good Friday, had a family date night Saturday, and Sunday we went to church and had lunch and dinner with Victor's family. Overall, it was a good weekend! Please enjoy the obligatory photo dump from our 3-day weekend!


We got Kenny a new type of food at Costco on Friday, then we mixed it with what was left of his old food. Seems as though he prefers the new stuff since he'd take mouthfuls of food, drop them on the floor, and only eat the new pieces.


Max and I picked up some donuts and coffee Saturday morning before Victor woke up. Then Max shouted, "Dad! Home! Doh! Cah!" (which means "Dad, we're home with donuts and coffee!") from the foot of the stairs until Victor came down.


Max helped me make some Easter cookies. He kept saying, "roll roll roll" as he used the rolling pin and "puh puh puh" as he pushed the cookie cutters into the dough.


For our family date night, we headed to Home Goods to search for some wall hangings. Max found this cool golf cart.


We then headed to Uncle Julio's Rio Grande for dinner (our favorite Mexican restaurant). We made friends with this bench bear while we waited for our table.


Max helped himself to Daddy's Easter candy before breakfast on Sunday.


Max kept himself busy by "locking and unlocking" the screws in the back of this chair during mass.


We dipped out of church early to beat the rush, change a diaper, and play outside. Then we headed back to Victor's parents' house for a late lunch and group photos in the backyard. Victor's mom's trees were so beautiful!

The soon-to-be weds, Victor's brother and his fiancĂ©e


The dudes
With my love
With some creep


I know I'm biased, but look how stinkin' cute!


It's virtually impossible to get a posed photo of this kid
Helping Vovo blow out his birthday candles. Max passed out in his high chair approximately 2 minutes after finishing his piece of cake.

Have a great week, loves!

Wednesday, March 23, 2016

Room Tour | Max's "Big Boy" Room

Now that Max has been moved into his new room for the past two weeks, I guess it's time to share the finished product with you all! I took pretty much everything he had in his nursery and moved it over to his "big boy room" with the exception of his crib and glider. His bed is my old full-size bed (still in great shape) from college and apartment life, and his chair was from his daddy's "bachelor pad." We had a nautical theme for his nursery, but it wasn't super overwhelming, so it was easy to incorporate into a less theme-y room for him to grow into. The main color scheme was navy, light blue, and red, but we've added some other colors into the mix, as well.

Come inside and have a look around! See the bottom of the post for info on where we purchased everything.


Max seems to be enjoying his new room; every time we go up for naptime or bed, he gets to the top of the stairs and runs in, saying, "Me room!" At two weeks into his transition into this new space, he is doing great! Perhaps I'll post some tips and tricks for transitioning a tot to a bed in the coming weeks. I'm by no means an expert, but I don't mind sharing the things we tried.


Headboard: Wayfair
Quilt: HomeGoods
Sheets: Target
Bed side rails: Amazon
Navy rope design pillow: Zulily
Light-blocking curtains: Target
Rug: Target (from 2015 summer indoor/outdoor rug collection)
Dresser: IKEA
Shadowbox: Target
Galvanized "M": Michaels
"live brave" print: Yellow Bungalow Shop; white frame: IKEA
Alphabet wall decals: Etsy
Chair: IKEA
Nightstand: vintage from Sweet Clover
Lamp: Zulily
Wicker anchor: Zulily
Wall shelf: Target